

Roezan's Automations allow you to automate your text messages, create text message sequences, autoresponders, and a lot more.
Here's what you need to know:
Create An Automation
Create an automation by going to automations and clicking "Create Automation"
You can give it a name and determine if you want to allow single entry or multiple entry.
Single Entry: This means that contacts are able to enter the automation ONLY 1 time.
Multiple Entry: This means contacts are able to enter the automation multiple times, if they meet the trigger conditions.
Automation Settings & Options
You can set automations specific settings by clicking on the 'settings' cog on the main automations page.
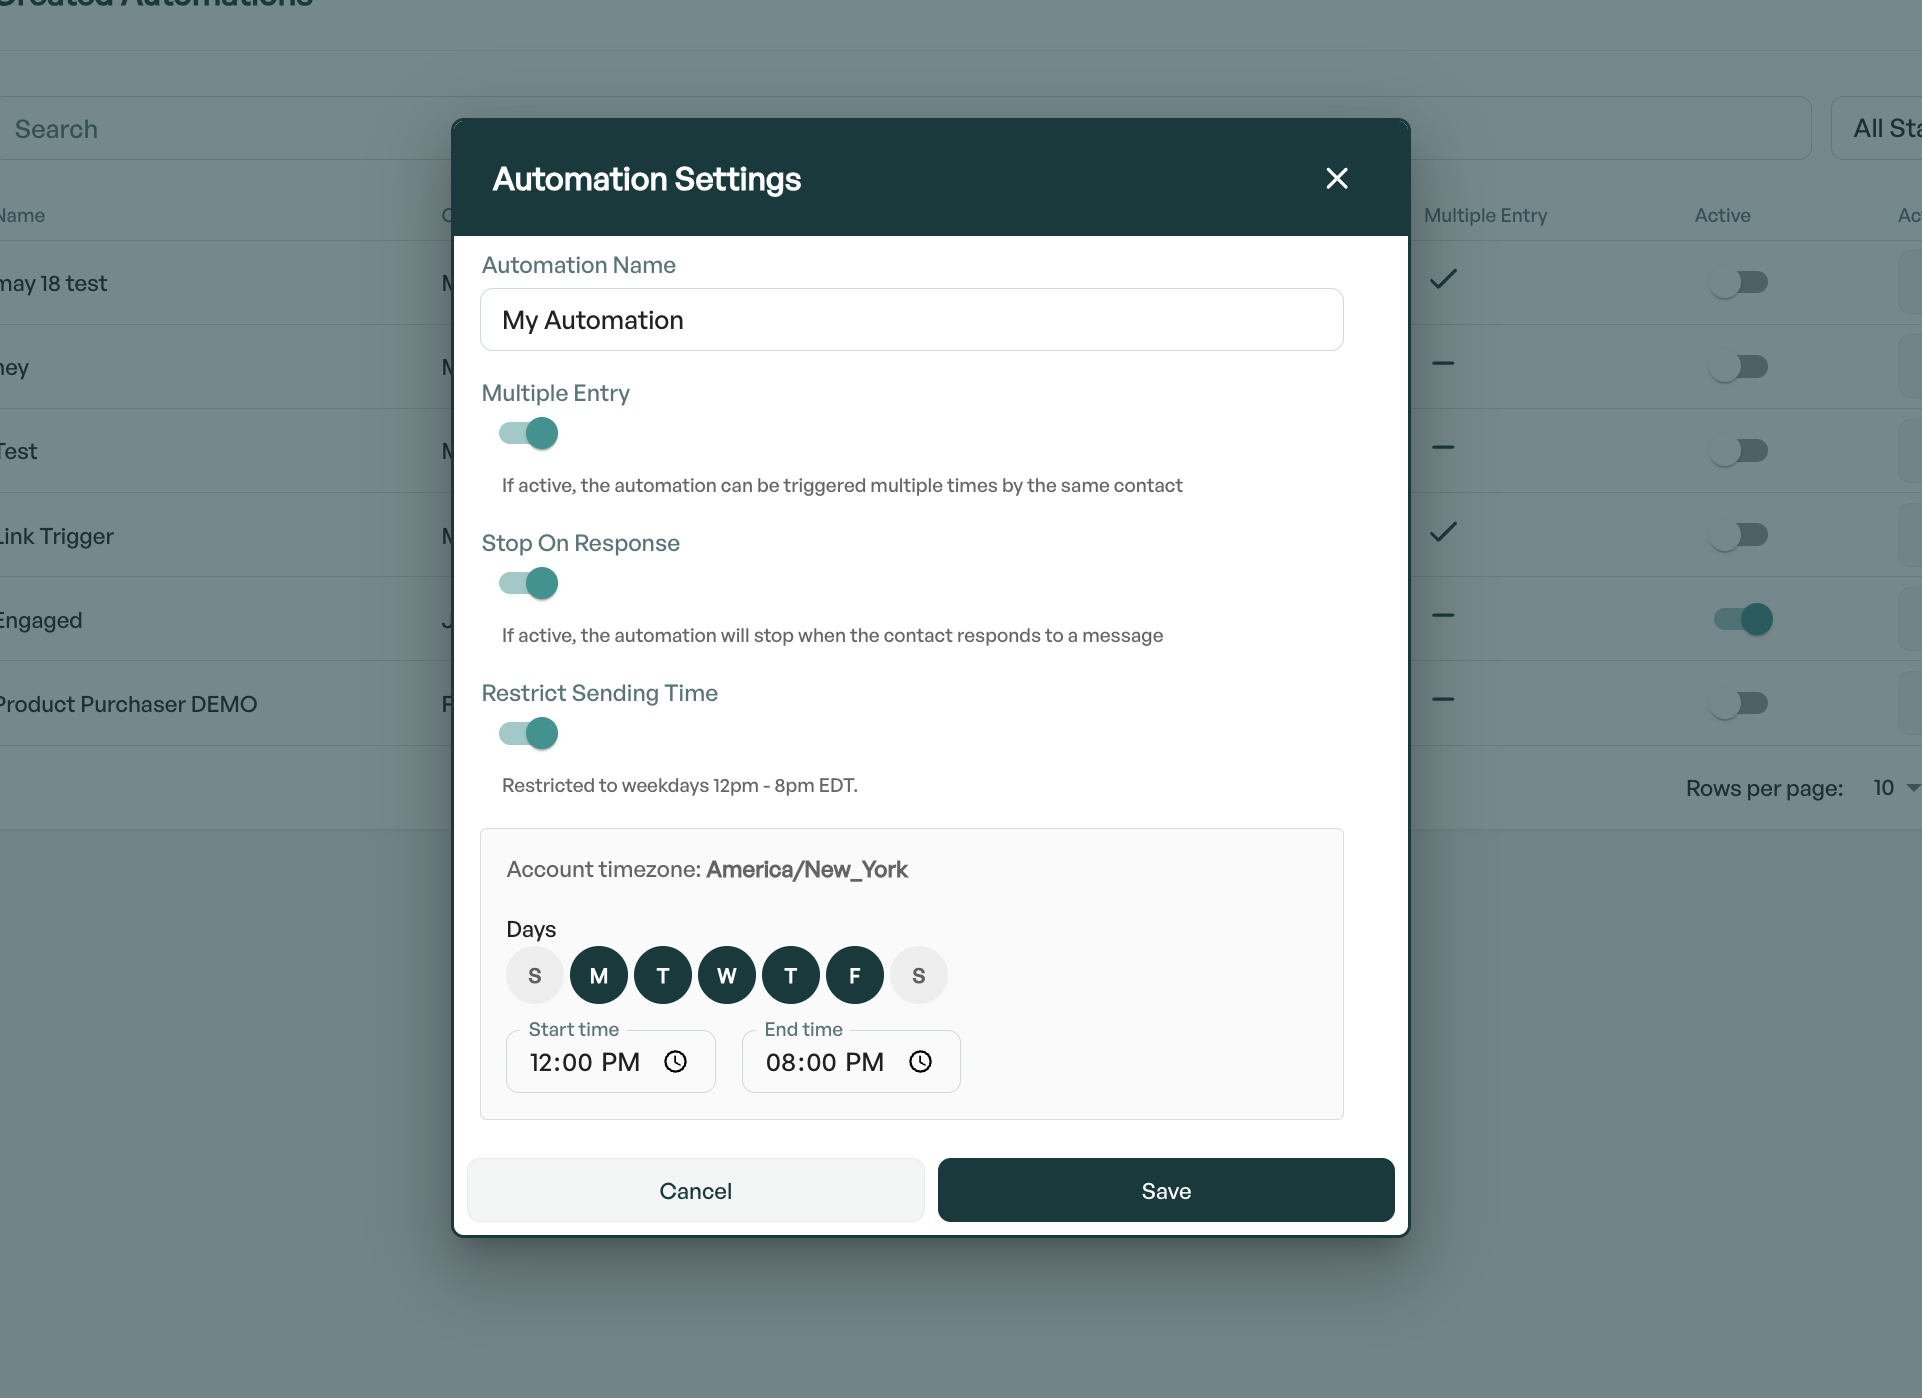
Here are the available options:
Multi-Entry or Single Entry:
Multi-Entry allows contacts to enter the automation multiple times.
Single Entry only allows each contact to enter the automations once.
Stop On Response:
If a contact responds to a message in the automation, the contact will be removed from the automation. This is useful in case you want to do a conversational follow up sequence, and want to pick up the conversation manually after they respond.
Restrict Sending Time:
This option allows you to set a time window in which the automation will run. The entire automation will be paused outside of the restricted hours set here.
Create A Trigger
A Trigger is the event that happens that starts the automation.
The most common trigger would be when someone is added to a list, or when a tag is added.
However, there are a handful of ways that you could start an automation:
Triggers:
Receive Message
Contact Tag Added
Contact Tag Removed
Contact Subscribed To List
Contact Unsubscribed From List
Contact Field Updated
Contact Clicked A Link
Create An Automation Step
An automation step is something that happens in the sequence.
The most common uses here is to send a text message, and/or wait for a period of time before sending another message.
Here are the available steps:
Send A Message (Includes SMS and MMS)
Update A Contact
Wait (For a Period of Time)
If/Else (Conditional)
Add A Tag
Remove A Tag
Subscribe To List
Unsubscribe From List
Opt-Out Contact
Adding A Step Condition
Sometimes you want to wait to see if a contact took an action, and send them down a different path based on what they did.
You can do this by using an "If/Else" Step.
The most common cases here is to check and see if they were added to another list, or a tag was added for example.
Options for conditions:
Is Day Of The Week
Is Not Day Of The Week
Field Contains Text
Field Does Not Contain Text
Field Is Greater Than
Field Is Less Than
Contact Clicked A Link
Contact Does Have Tag
Contact Does Not Have Tag
Contact Is Subscribed To List
Contact Is Not Subscribed To List
Turning Automations On/Off
You can turn automations on and off from the main automations screen.
Turning an automation ON: This allows contacts to enter the automation.
Turning an automation OFF: Contacts cannot enter/start the automation. Existing contacts will be frozen in their current step.
Note: If an automation is turned off, and subsequently turned back on, the current step the contact is in will re-start. For example, if a contact is currently in a 1 day wait period when the automation is turned off, when the automation is turned on it will re-start that 1 day wait from the beginning.
Automation Analytics Overview
Every automation keeps a record of what it did: How many contacts entered, where they went, what they got, and how they responded. There are two places to look, and they answer different questions.
Stats and Runs (inside the automation builder): best for "where are people dropping off?" You see your numbers laid over the flow chart itself, plus a list of individual contacts you can click into.
Analytics (the full-page report): Best for "give me the numbers in a table." Same data, laid out as summary boxes and a sortable step-by-step table.
Note: Detailed automation tracking began July 29, 2026. If your automation was created before that date, you'll see a small notice on the stats view. Activity from before then isn't included in these numbers.
Automation Analytics Page
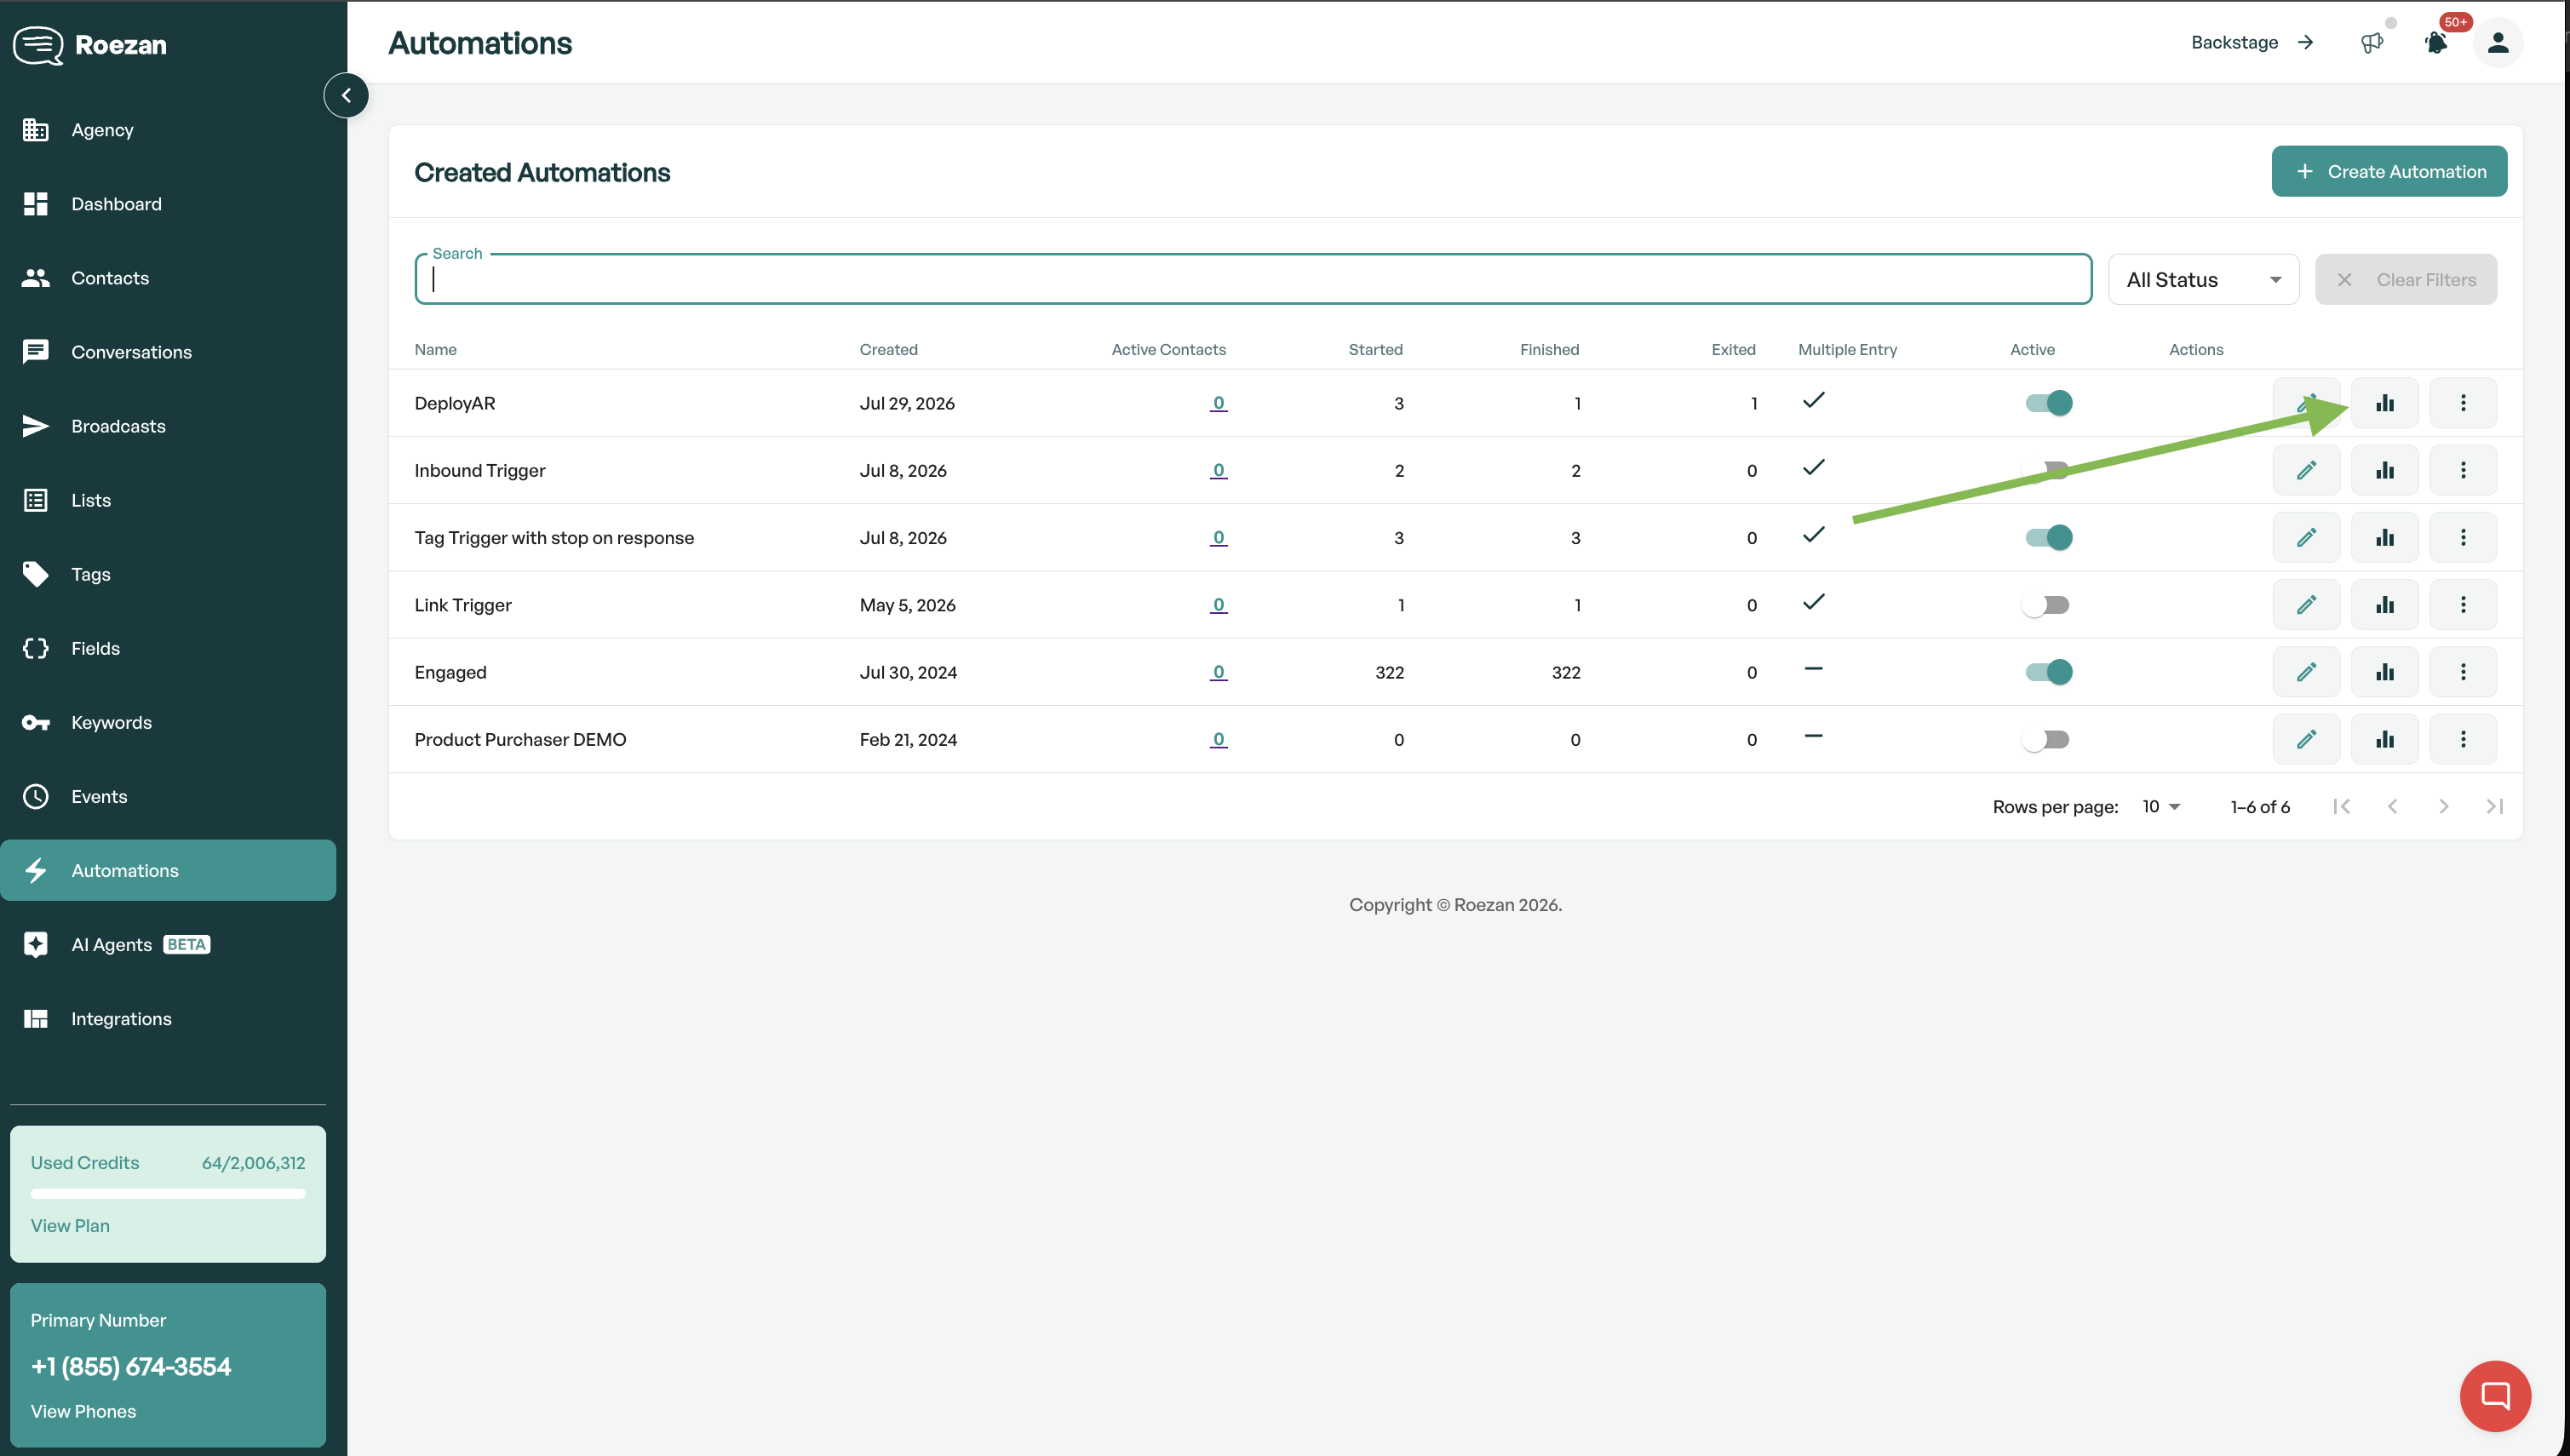
From the automations list, click the bar-chart icon on any row to open the full Analytics page.
The top of the report is split into two groups, Automation & Messaging.
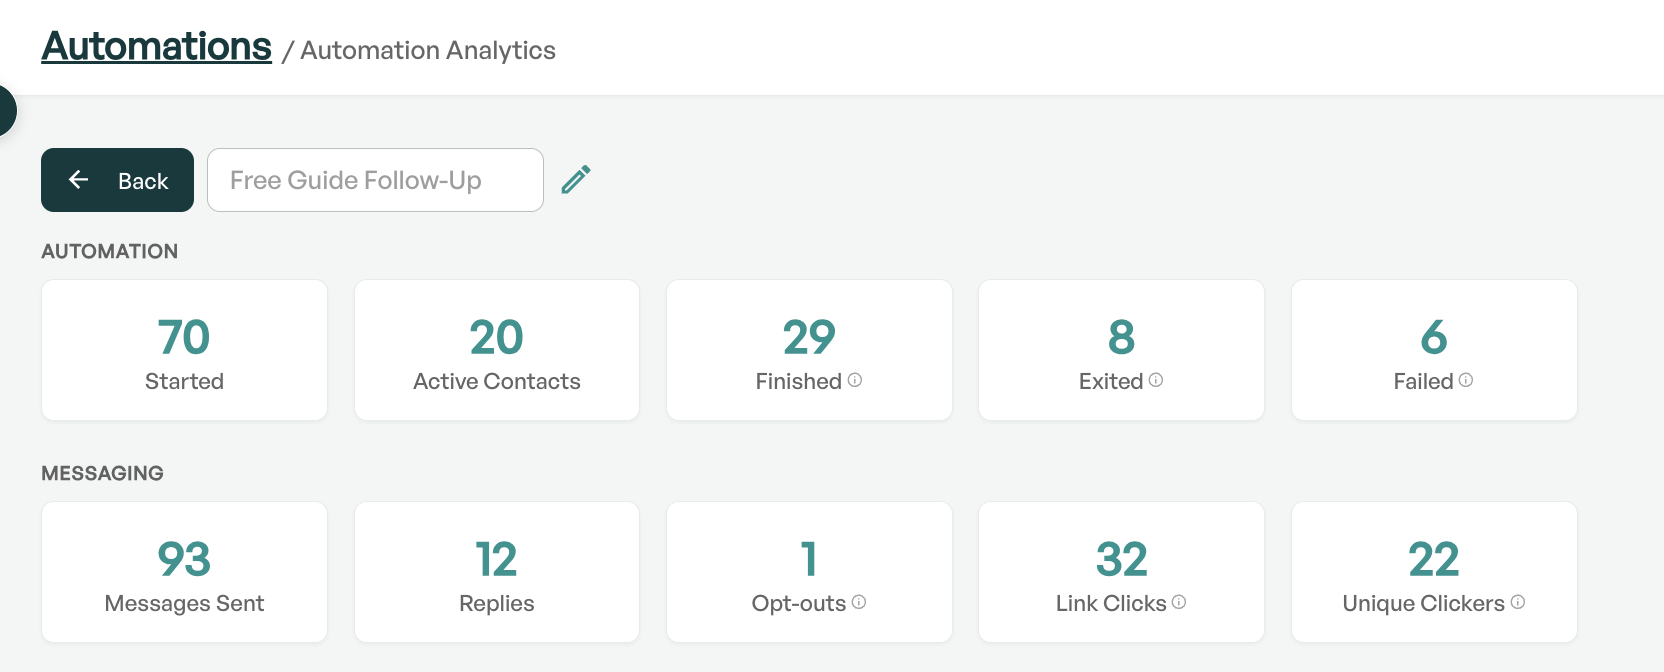
Automation:
What happened to the contacts themselves:
Started: contacts that entered the automation
Active Contacts: contacts currently working their way through it
Finished: contacts that reached the end
Exited: contacts that left before reaching the end. Hover the box to see why they left, broken out by reason:
Stop On Response: They replied, and the automation is set to stop on a reply
Automation stopped: The automation was turned off while they were in it
Removed manually
Step Error: A step failed and the run couldn't continue
Failed: Step failures across the automation, such as a contact with no usable phone number, a blocked destination, or a step erroring out
Messaging:
What those contacts did with your texts:
Messages Sent: Texts this automation sent
Delivered: Texts confirmed as delivered by the carrier
Replies: Replies that came back
Opt-outs: Contacts who replied STOP while your automation's message was the last thing they received
Link Clicks: Total clicks on links this automation sent
Unique Clickers: How many different contacts clicked. Someone who clicks links in two different steps counts once here, so this won't equal the sum of the per-step numbers
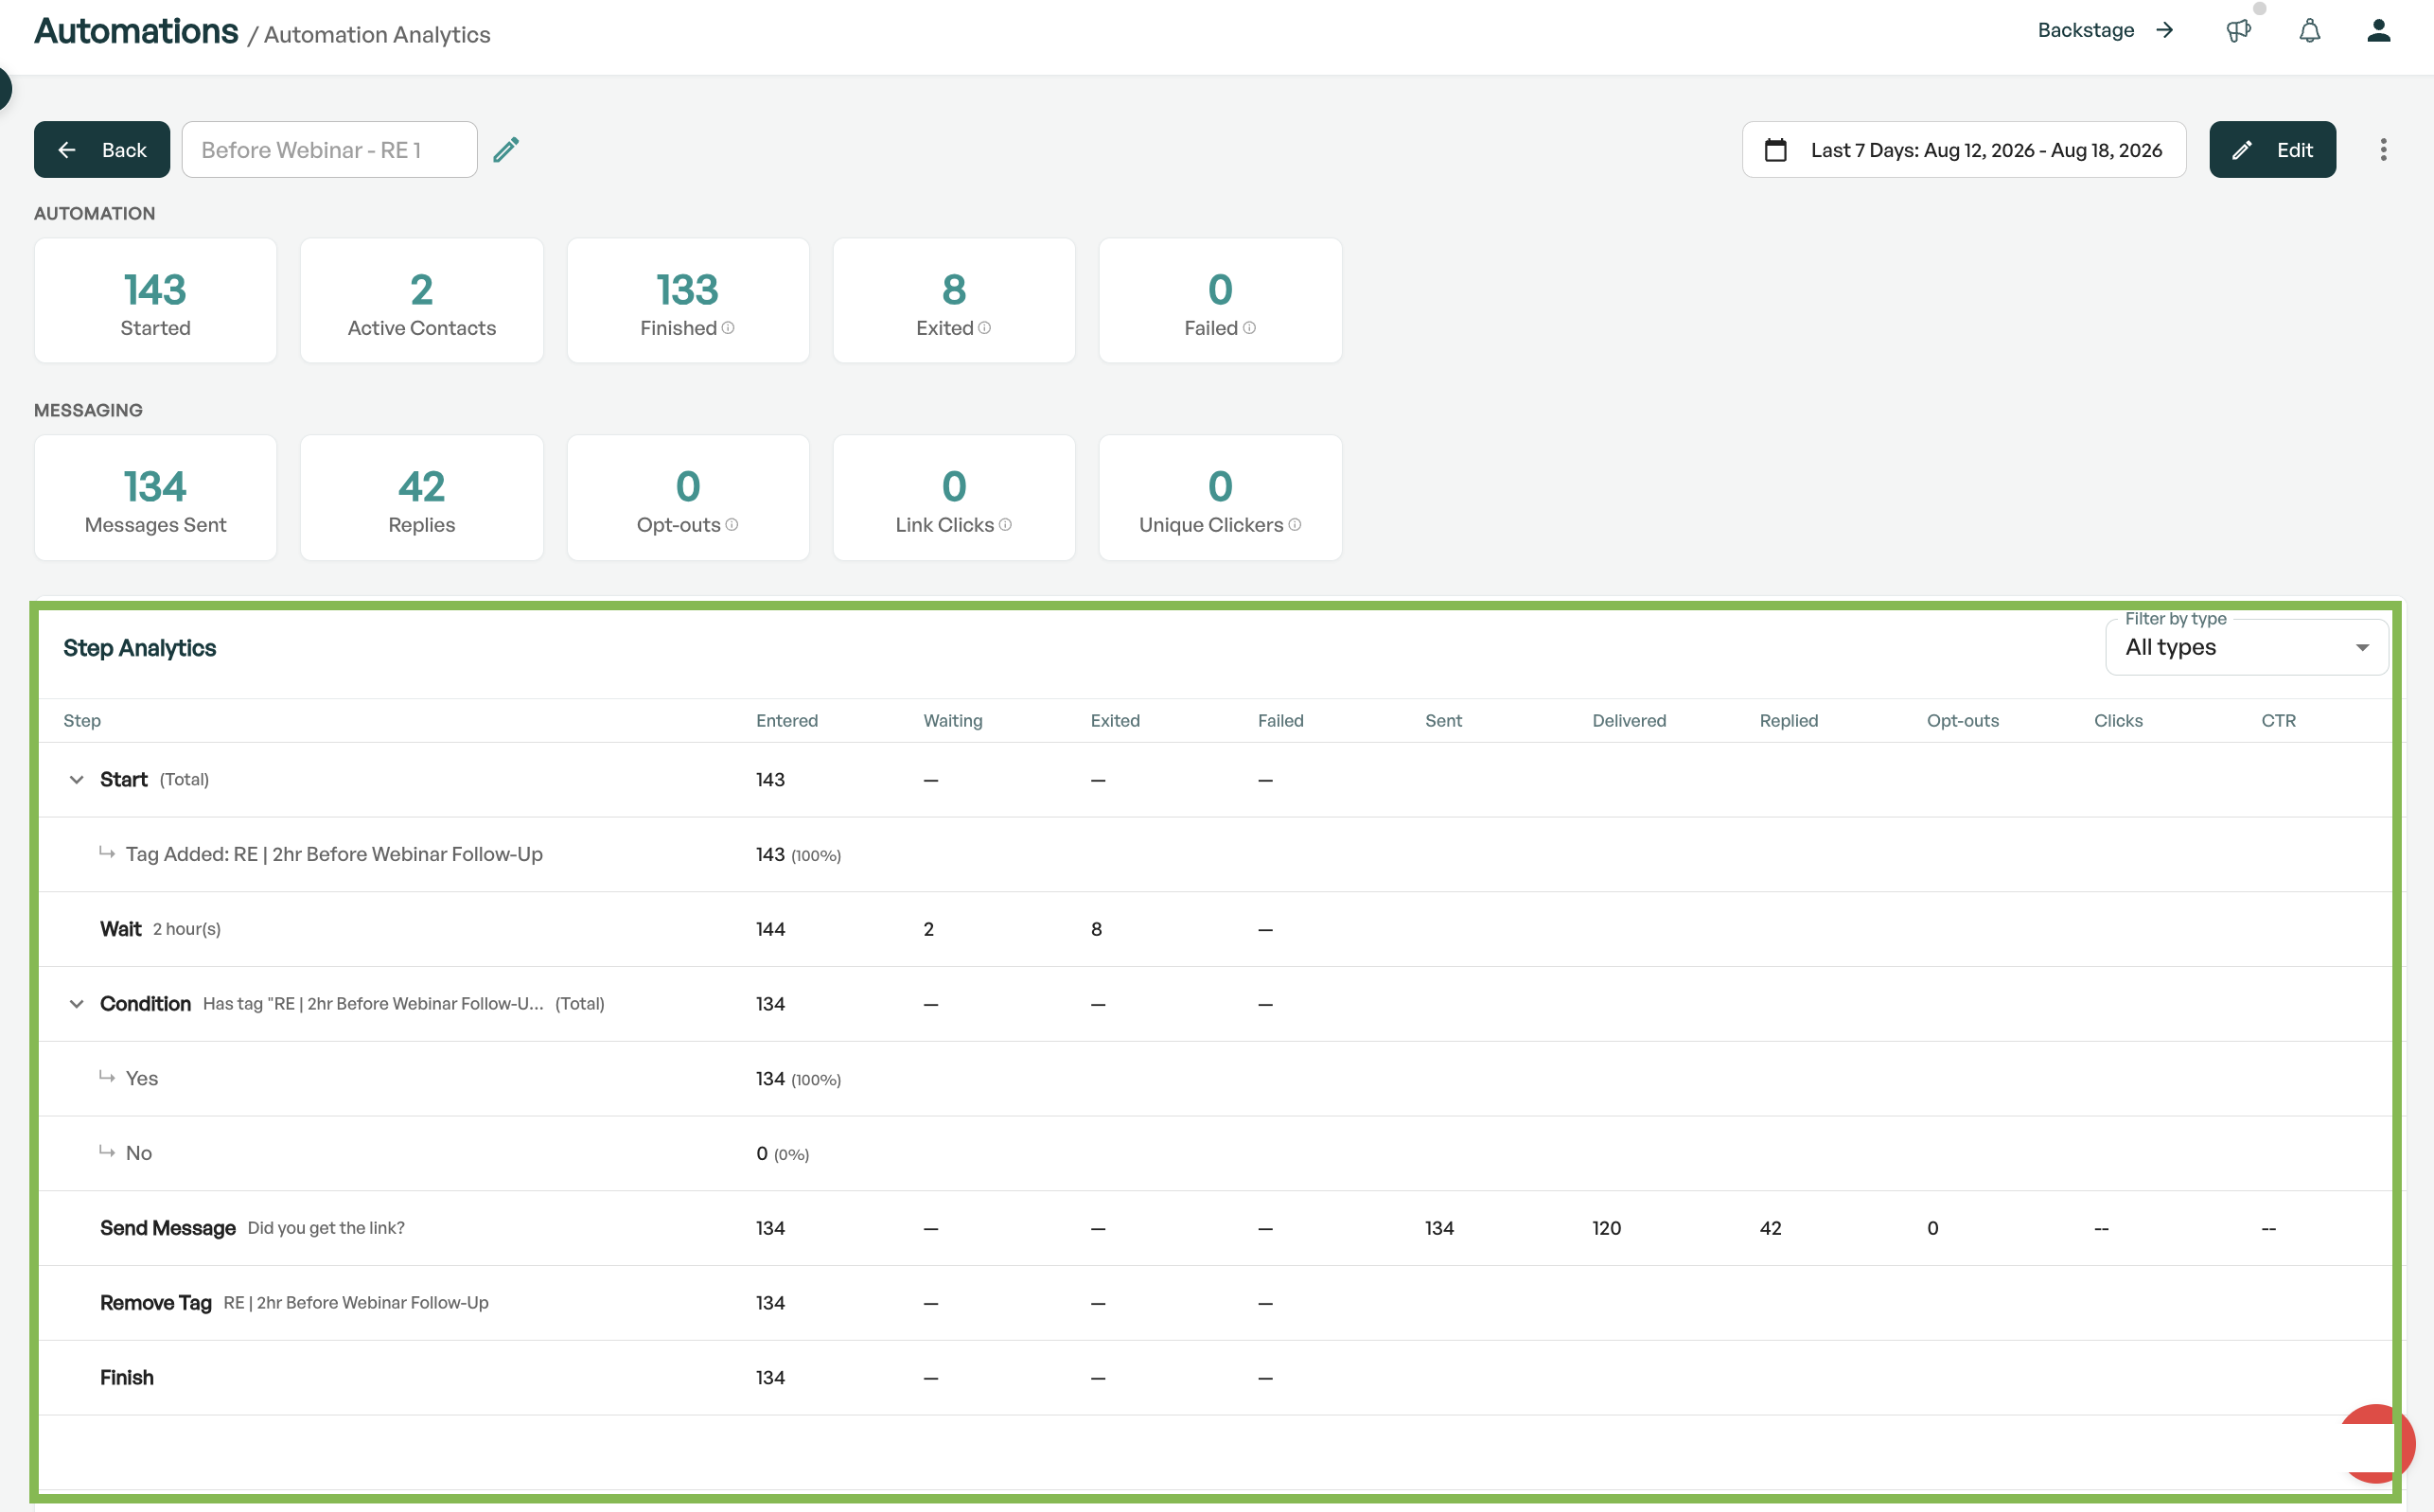
Automation Step Analytics Table
Here you can see the funnel step by step instead of just the totals.
Stats & Runs (Flowchart Analytics View)
From inside the builder open your automation and use the Build / Stats and Runs switch at the top.
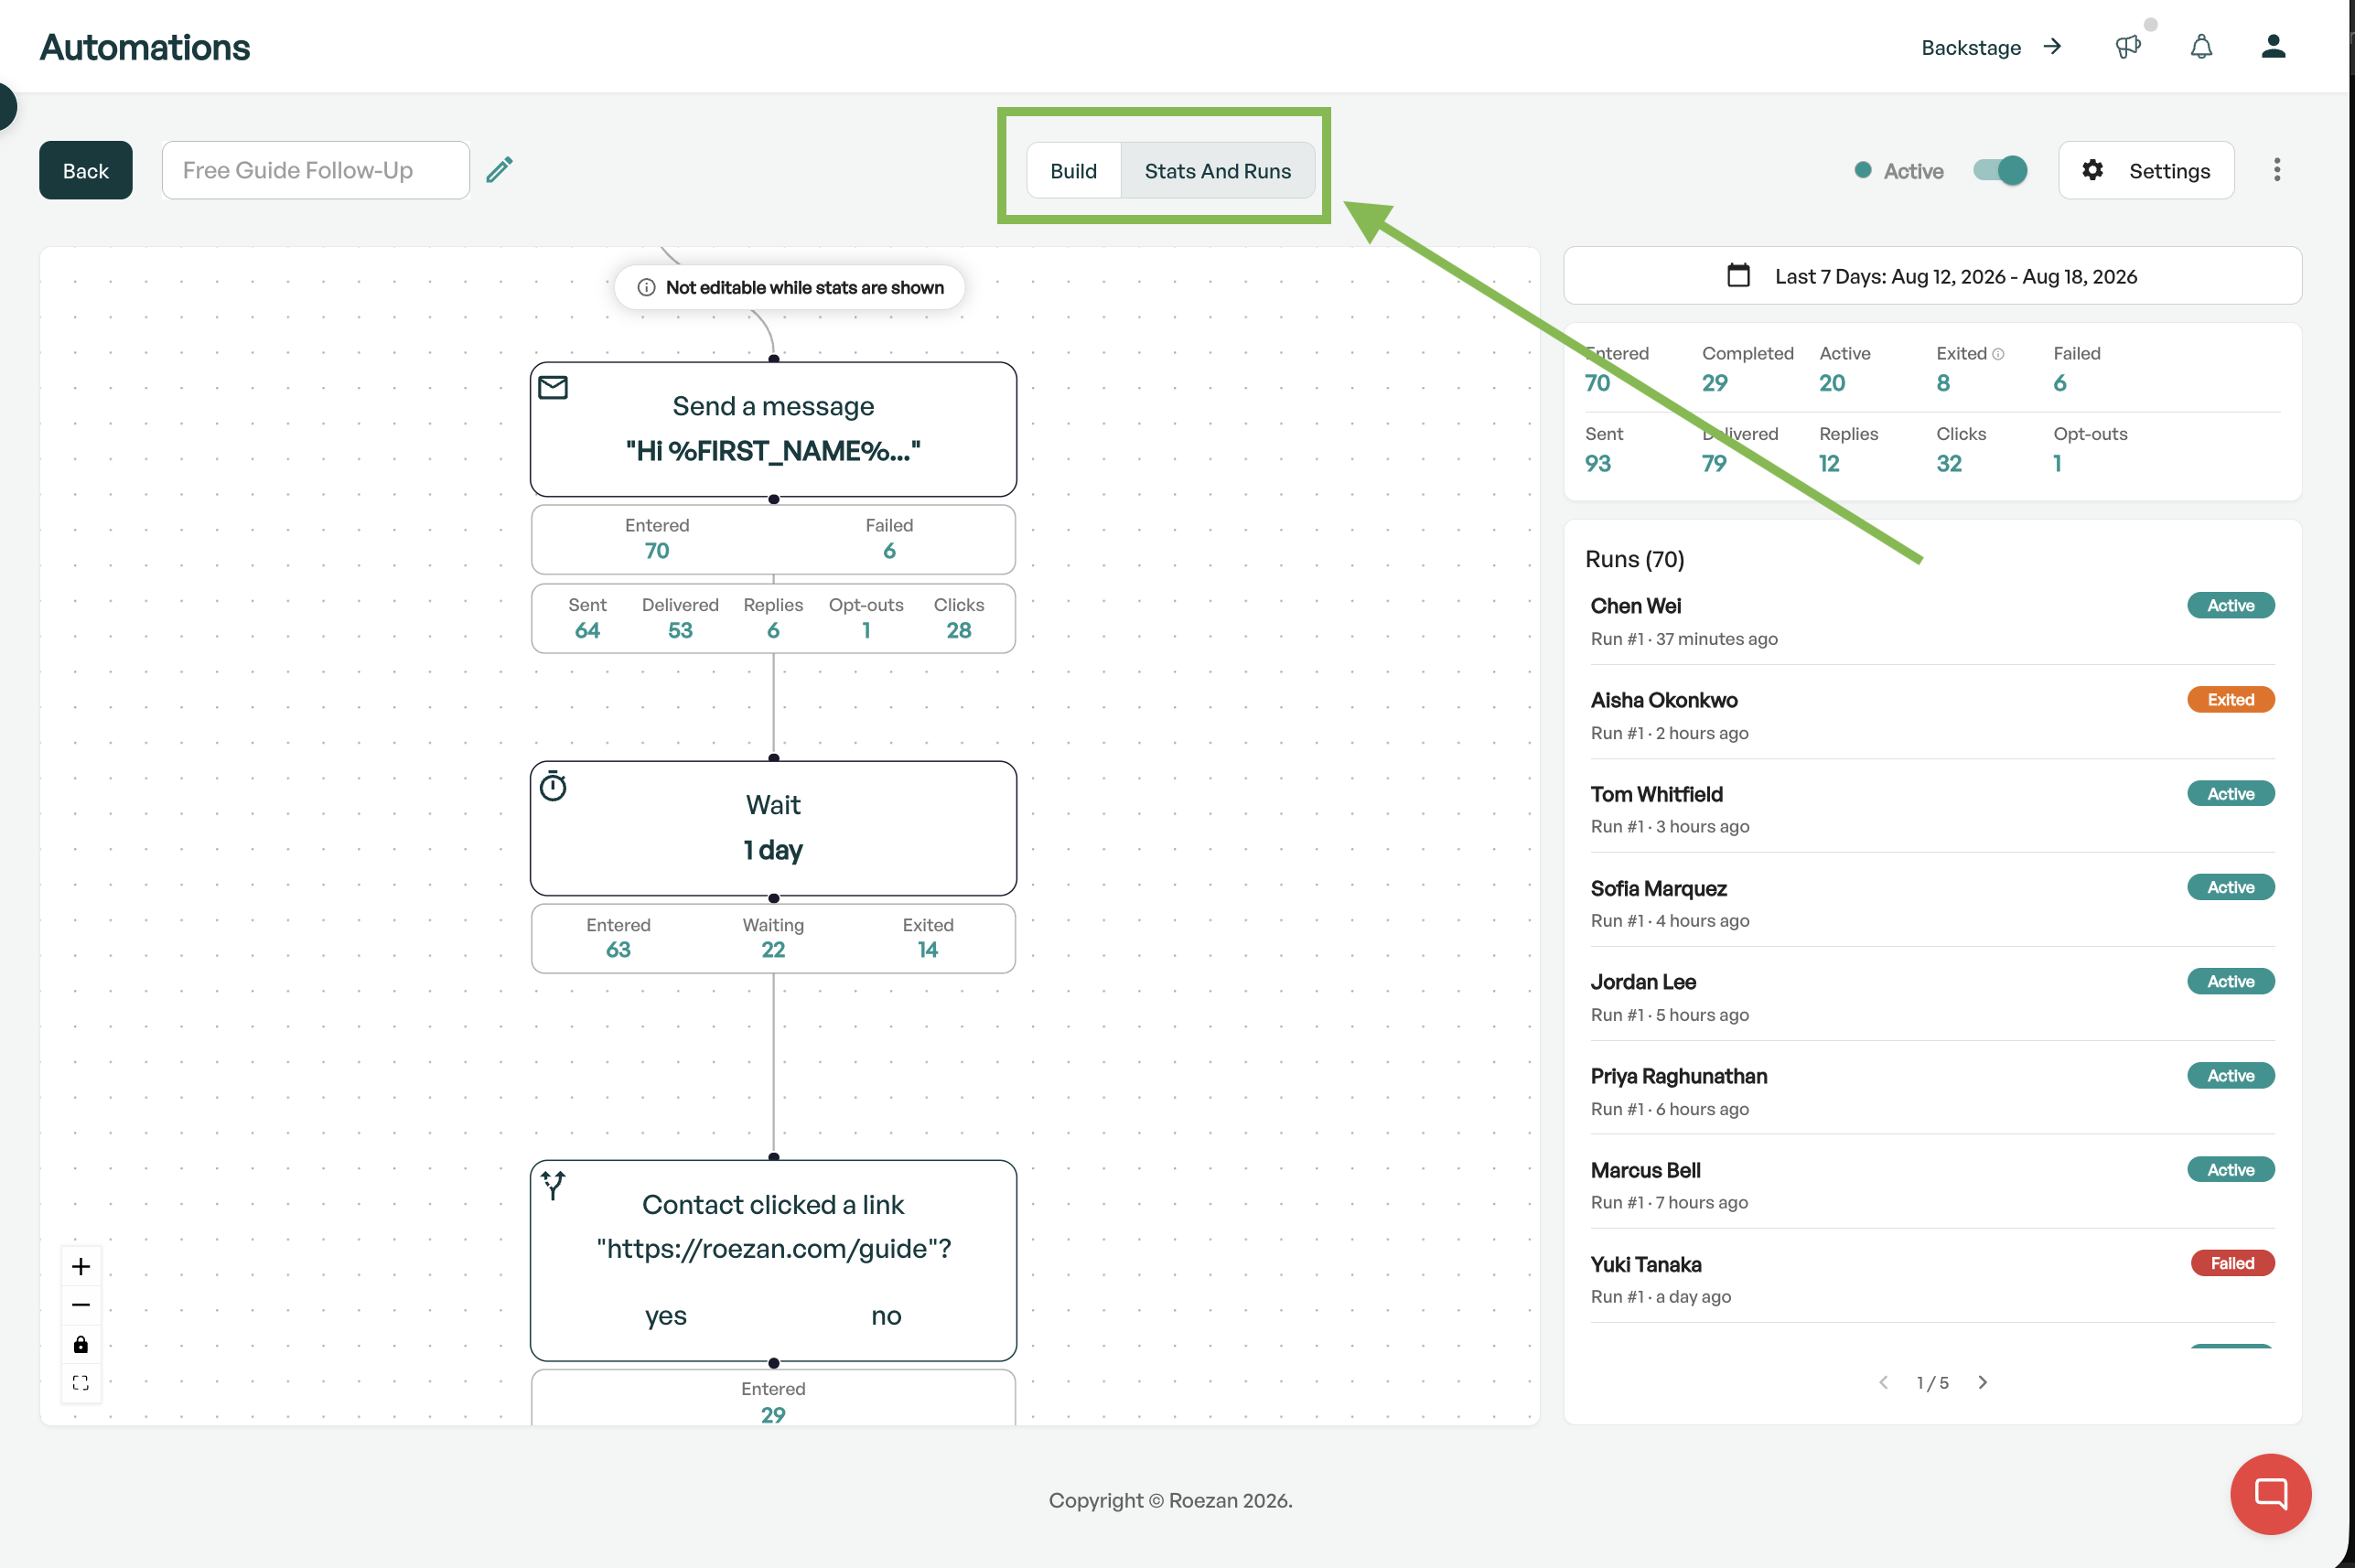
On the flow chart (Stats and Runs view), every step carries its own numbers underneath it:
Entered: How many contacts arrived at this step
Waiting: How many are sitting on this step right now. Mostly useful on wait steps
Exited: How many left the automation at this step (removed, stop on reply, etc)
Failed: Only appears when something actually failed, so a clean automation stays clean-looking
On message steps you also get:
Sent
Delivered
Replies
Opt-outs
Clicks
Trigger And Branch Breakdowns
Two rows in the table expand to show how the total broke down. Click the arrow to open them:
Start expands into one row per trigger, so you can see which trigger actually brought people in and what percentage each one accounted for
Conditions expand into their branches, so you can see how many contacts took Yes versus No
Runs: Seeing A Specific Contact's History
A run is one contact's trip through the automation.
If a contact enters the same automation twice, that's two runs, numbered Run #1, Run #2, and so on.
The Runs list sits beside the flow chart in the Stats and Runs view, newest first. Each entry shows the contact, the run number, when it started, and a status:
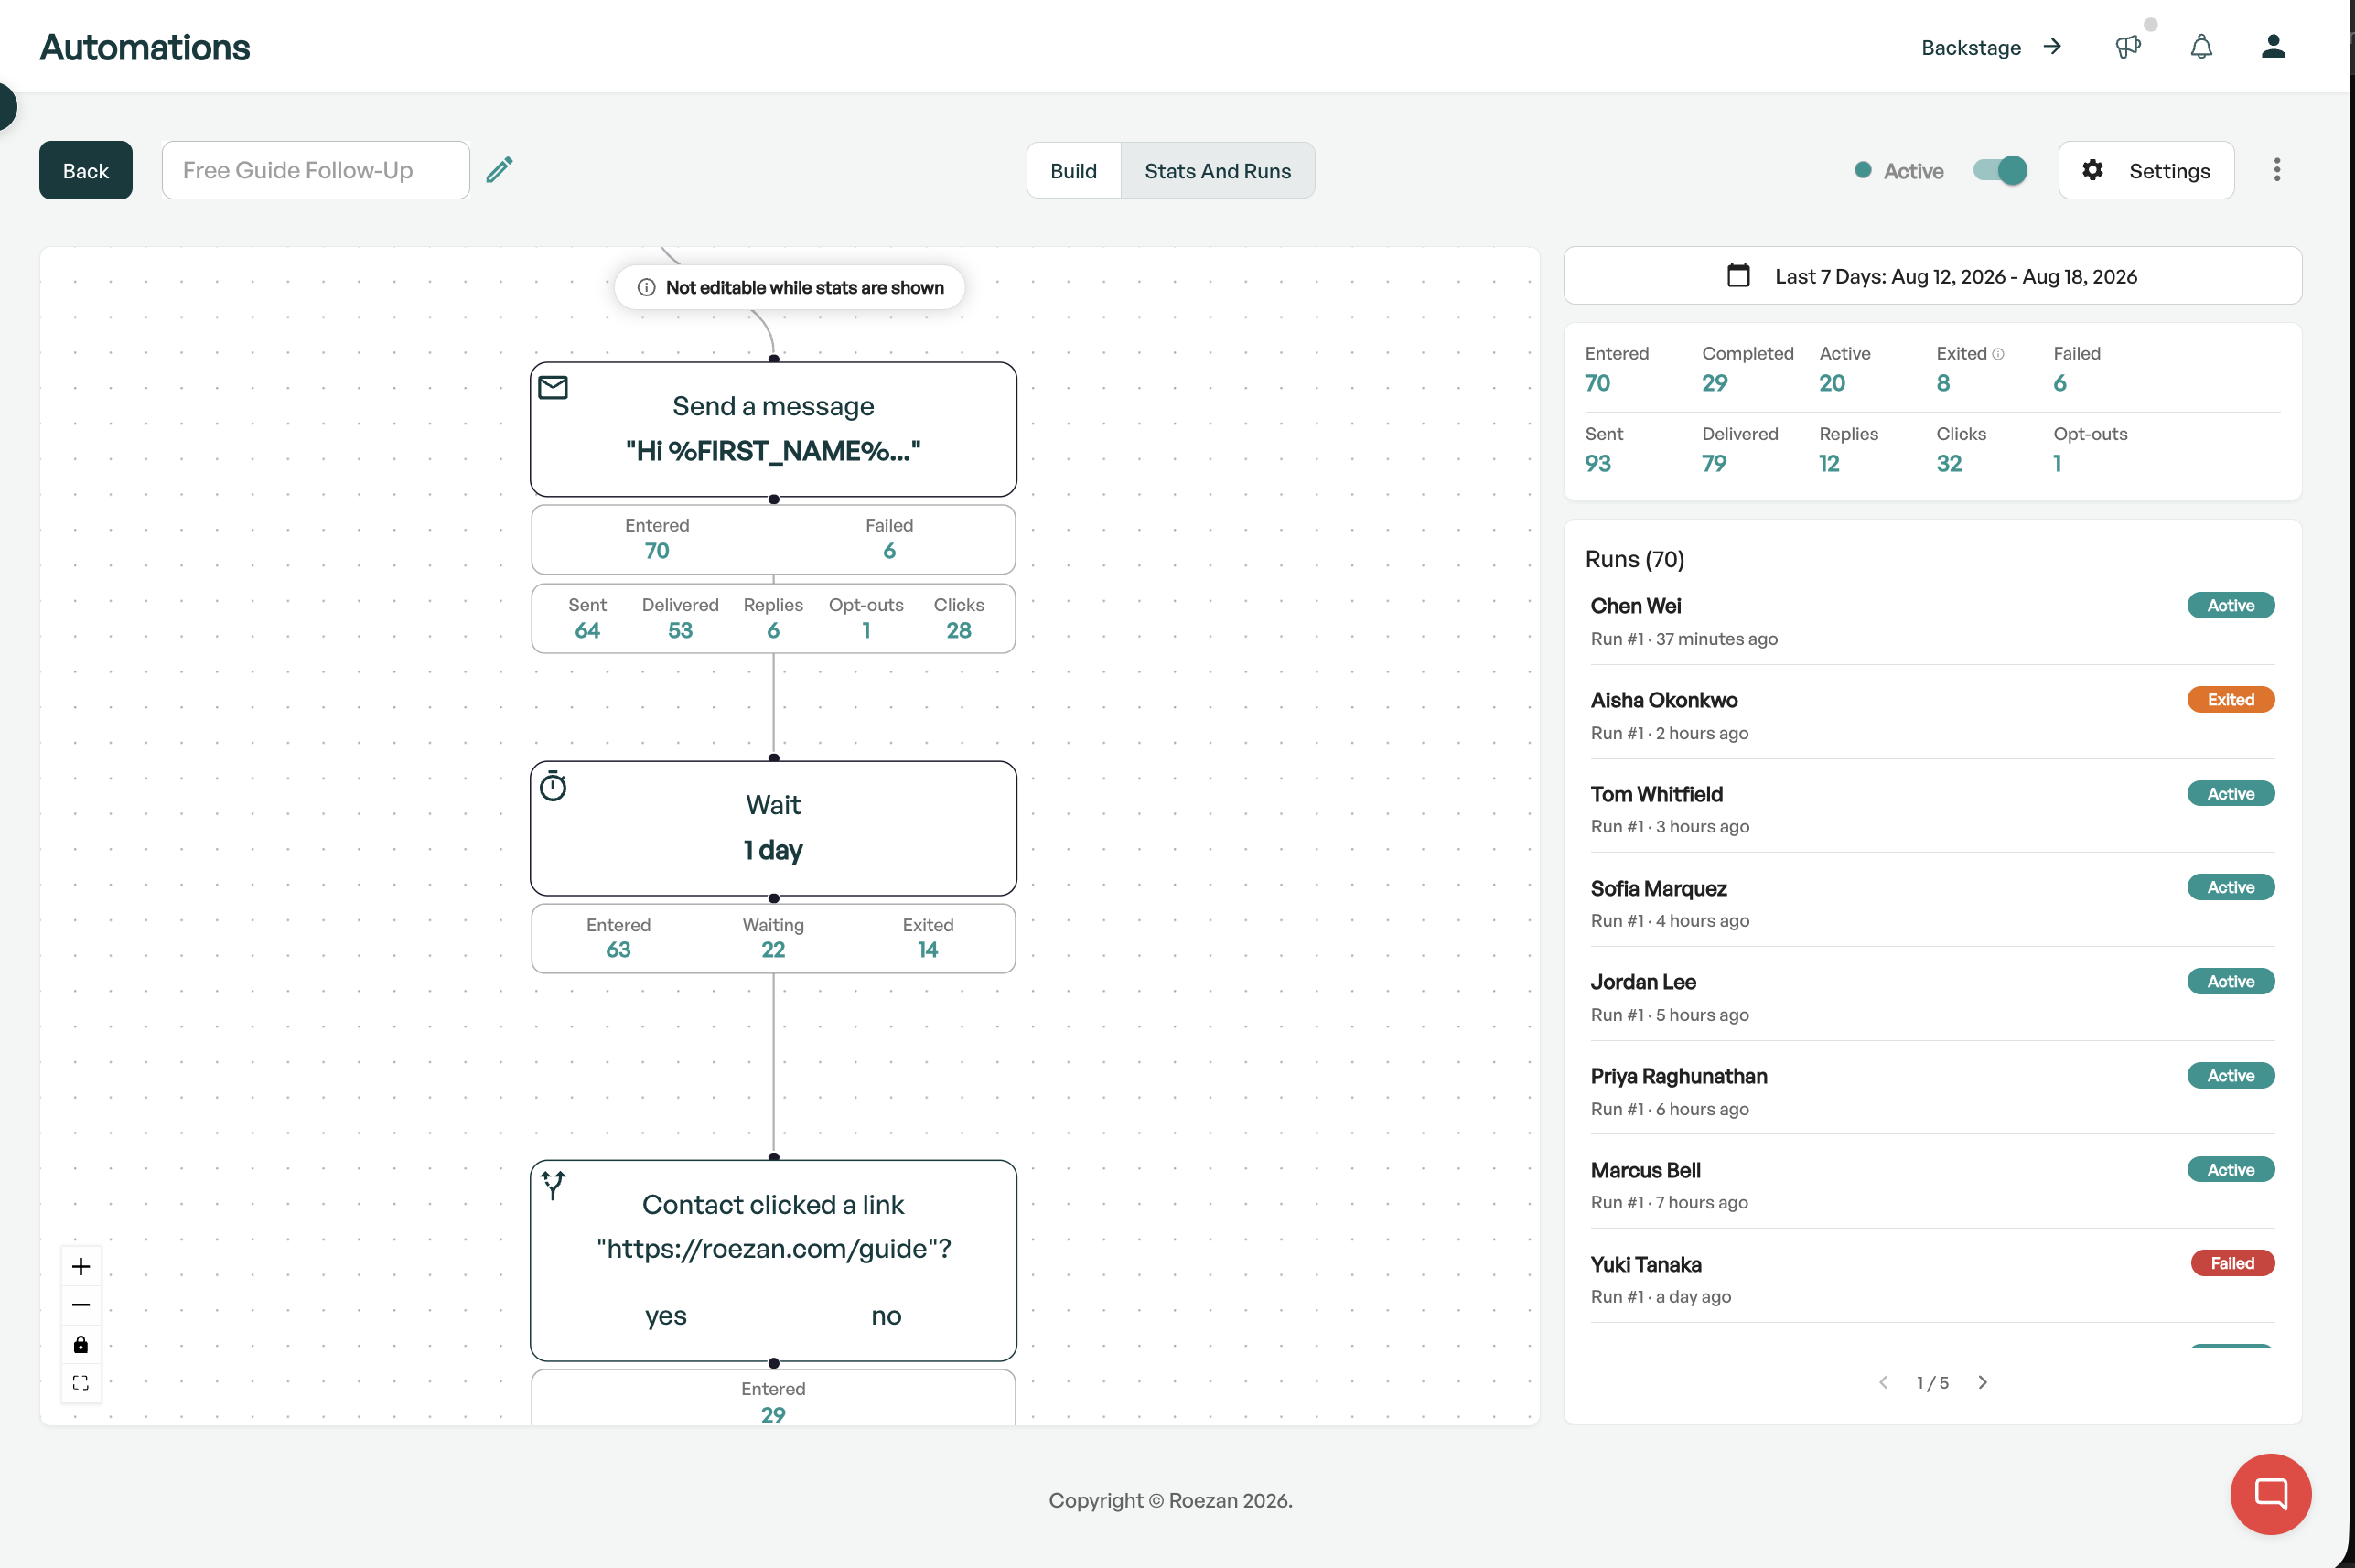
Active: Still in progress
Completed: Reached the end
Exited: Left early
Removed : Taken out of the automation
Failed: A step failed and the run stopped
Run Details
Click any run to open it. The flow chart redraws to highlight the exact path that contact took, and the panel beside it fills in with the detail:
Run details: The contact's name, email and phone, when the run started and ended, why it ended, and what triggered it
Executed steps: Every step that contact actually hit, in order, with a timestamp. For message steps you see the exact text that contact received, with merge fields filled in and links shortened. If your template says something different, the original template shows underneath
A few things the panel will tell you when they apply:
If the run is still active, the highlighted path is what's happened so far. The rest of the automation is dimmed, and you may still change it before that contact gets there
If you've deleted a step the contact already ran, it can't be shown on the chart, so it's listed separately and marked Removed
Very old runs from before detailed tracking won't have a highlighted path